Lightwave Layout - Animation Basics
Time Control | Key Frames | Graph Editor | Editing Bezier Curves | Moving keyframes in time in the Graph Editor
Time Control

At the bottom of the Layout window you can find the timeline. In the image above, the start time is set to 0, the end time to 60, and the current time slider to 12. You can drag this slider left and right to move through the frames of your animation
The vertical yellow lines on the timeline represent keyframes, in this image at 0, 30, 37 and 45
You can use controls on the right to play back your animation
↑ Top ↑ Keyframes
If Auto Key (SHIFT-F1) is selected (yellow), actions like moving, rotating or scaling objects will automatically set a keyframe for the changed parameter on the current frame

Setting keyframes manually
Hit Return. The create motion key window will appear
- You can set the key at the current frame, or type in another frame number
- For:
- Selected Items: All items selected, including the current item
- Current Items Only: Only the current item, even if others are selected
- Current Items and Decendents: The current item and any child items (see parenting)
- All items: keys will indeed be set for everything, not just of the selectd type (objects, Camera, Lights, etc)
- The key will be set for the selected parameters: Position (XYZ), Rotation (HPB) and / or Scale (XYZ)
Rotation: Heading, Pitch, Bank
The terms HPB are often used to express the rotation of the camera. They correspond to rotations along the X, Y and Z axis.
Deleting Keys
With Delete Key (DELETE) you can delete keys already set. A requester will pop up that should be self explanatory
↑ Top ↑

The Graph Editor
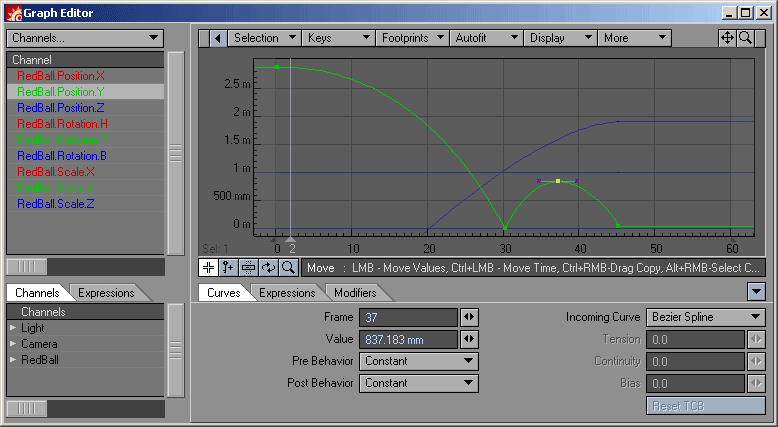
You can edit animation channels (the keys for specific parameters) by opening the Graph Editor (CTRL-F2)
When you open this editor, and press the letter key o, the Graph Editor Options window opens.
Animation curves can use a number of interpolation modes, here defined by Incoming Curve. If you set this to Bezier, you get a curve you might recognize from other graphics software, like Adobe® Illustrator®. This type of curve most closely resembles the kind of curve used in most other 3D animation packages, like Autodesk® Maya or Softimage® XSI

The Graph editor consists of four regions:
- Channel Bin (Upper Left)
Here you see the available channels and select the one you want to edit - Scene / Expression List (Lower Left)
A list of all available channels and expressions in your scene - Curve Edit Window (Upper Right)
Displays the curves, here you edit them - Curve / Expression Controls (Lower Right)
The Curve tab displays the values of the selected key, you can also change them here. An important one is the Incoming Curve: here you select what type of curve you want to use.
I find the easiest way to select a key in the Curve Edit Window is using the RMB to drag a rectangle around it. You can also Left Click on the key you want to select but you might move it
↑ Top ↑Editing Bezier Curves
As I explained above I advice to use Bezier Curves, the other ones are particular to the Lightwave software

 On a selected key you will see handles
You can navigate the Curve Edit window just like you do a scene: hold ALT to move, CTRL-ALT to zoom in (No, you cannot rotate this view, silly!)
You can grab the handles to adjust the slope (= speed of change) of the curve. In the image on the left, the curve is continuous: the incomming slope is identical to the out-gouing slope, making for smooth animation.
In the image on the right, the slope handles are "Broken", the speed at the keyframe is discontinuous. You can brake the handles by dragging them while holding ALT. You can make them line up again, make them continuous, by double clicking on one of the handles
Note that for both hanldes to affect the curve, both this and the following keyframe need to be set to Bezier
↑ Top ↑Moving keyframes in time in the Graph Editor
You can move keyframes in time: drag them while holding down CTRL
↑ Top ↑